
")
Selling on Amazon is one of the fastest ways to launch an online business, but the platform’s rules, fees, and competition can be overwhelming if you don’t know what you’re doing. In this step-by-step guide, I’ll show you how to sell on Amazon in 2025, from choosing a selling plan to promoting your products. Whether you’re a first-time seller or looking to add another sales channel to your e-commerce store, you’ll find everything you need to start strong, avoid costly mistakes, and build a profitable Amazon store.
Step 1: Choose a selling plan
The first step to getting started on selling on Amazon is to choose a selling plan. Amazon offers two selling plans, Individual and Professional. If you’re just starting out, the Individual plan gives you a low-risk way to test the platform. You can upgrade to Professional once you’re ready to scale.
- Individual ($0/month, $0.99 per item sold): Best if you are just starting out or selling fewer than 40 items per month.
- Professional ($39.99/month, no sale cost): Best if you are selling more than 40 items per month or selling under restricted categories.
Both plans have the same Amazon product-related fees, allow you to sell existing Amazon products, add new products to the Amazon catalog, and give you access to the Amazon Seller App and Fulfillment by Amazon (FBA).
However, there are a few key differences:
| Amazon Professional Seller | Amazon Individual Seller | |
|---|---|---|
| Monthly fee | ||
| Product listing fee (charged when sold) | ||
| Number of product listings/sales per month | ||
| Listings eligible for the Buy Box* | ||
| Offer coupons, shipping specials, and gift wrap | ||
| Can apply to sell in restricted categories | ||
| Bulk upload products or feeds to Amazon | ||
| Access to inventory reports | ||
| Connect with third-party services and product feeds |
*Your listings are eligible for the Buy Box feature — this means your listing is the one that Amazon automatically sells when a customer clicks the “Add to Cart” button on a product listing sold by multiple sellers.
Step 2: Register for an Amazon seller account
Once you decide which seller plan to sign up for, it’s time to create your seller account. The process is simple and straightforward, but having your documents ready will save you time. Have the following ready:
- Government-issued ID: Passport, driver’s license, or national ID
- Bank account info: Routing and account numbers for deposits
- Credit card: Must be valid and able to process international transactions
- Phone number: For verification and future account access. Note that you may be asked to join a live video verification call to confirm your documents. Use a quiet, well-lit space and have your original documents ready during the video call. Missing or failing the call can stall your setup.
After gathering your documents, follow these steps:
- Go to sell.amazon.com and sign in with your existing Amazon customer account or create a new one. Amazon recommends using an email address different from an existing Amazon customer or Amazon Business account you may have (but there is no issue if you want it to be the same). But if you have an Amazon Brand Registry, Amazon Ads, or Vendor Central account, sign in using that one so you can sync access to both accounts.
- Choose your business location and business type (e.g., individual, privately owned business). Note that you don’t have to be a registered business or an LLC to sell — you can select None, I am an individual under Business type, and Amazon will update the registration process to collect more information.
- Provide information as the primary contact person. Use a government-issued ID and enter the following:
- Your full legal name (including middle name)
- Country of citizenship
- Country of birth
- Date of birth
- Residential address
Add your phone number and indicate if you are a beneficial owner of the business, a legal representative of the business, or both. A beneficial owner is a person who directly or indirectly owns more than 25% of the shares or voting rights of the business, or they own the business via other means, while a legal representative is legally authorized by your business to manage and act on its behalf.
- Provide billing information, including a chargeable credit card — this will be used to process payments and expenses. Amazon accepts American Express, Diners Club, Discover, JCB, MasterCard, and Visa. The credit card you enter also does not need to be under your name or the name of your business.
- Create your store name and add basic product details. Your store name needs to be unique (not already in use by another seller) and doesn’t have to match your business name.You will also need to provide product IDs (known as Global Trade Item Numbers or GTINs) to identify products and pair them with the correct product detail pages in the Amazon store. They can often be found on packaging above or below a product’s barcode. The most common GTIN used by Amazon sellers is a UPC, but you might also find an ISBN, EAN, or JAN on your product.
- After submitting your store information, you will be asked to upload the following documents — a government-issued ID and proof of residential business address dated within the last 180 days, like a bank or credit card statement. After uploading the documents, you will be prompted to either take a photo of your face and government-issued ID or join or schedule a video call with an Amazon associate. If this happens, make sure to bring your government-issued ID and proof of residential address to the call.
After you upload all required documents and complete your registration, Seller Central will show a confirmation message. Amazon will review your submission and may follow up within two business days if anything needs clarification. If Amazon can’t verify your submission and requests updated documents, you’ll have 30 days to respond. Failing to provide the requested materials within that window will result in the closure of your onboarding process, and your account won’t be activated.
The verification process usually takes three business days if your documents meet all the requirements, longer if they need clarification. Amazon recommends that you use this waiting period to prepare for selling. It provides webinars and an extensive knowledgebase of videos and how-to guides you can learn from.
Step 3: List your products
Once you get your seller account approved, you can start listing your products. There are three ways to create product listings: adding it to an existing product listing, creating a new listing, and using product feeds from an e-commerce platform like Shopify.
To understand how each method works, it’s important to understand how a product detail page works first. The product detail page shows everything a customer needs to know about an item. If multiple sellers offer the same product, Amazon groups their offers on one shared page so shoppers can easily compare options and make a purchase.
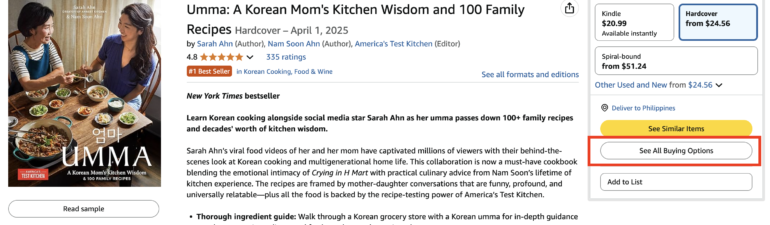
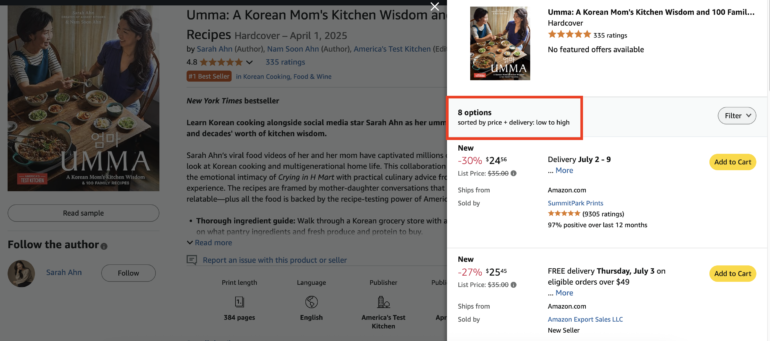
All seller offers for a product appear on the same product detail page. Each offer includes pricing, shipping details, and any available promotions. This arrangement sets you up with some tough competition, so you need to know how to stay on top when it comes to pricing, competitive offers (such as free shipping), or being a Featured Offer (I will discuss more pricing strategies after this section).
Manually add your product to an existing listing
If a product is already being sold on Amazon, you don’t need to create a new listing from scratch. Instead, you can add your offer to the existing product detail page, which is shared by all sellers of that item.
While it may seem like a competitive disadvantage, many sellers only keep limited stock. Once they sell out, your offer becomes the next available, so you still have a strong chance of making sales. Offering a lower price, free shipping, or using FBA can also help your listing win the Buy Box.
Here’s how to add your product to an existing listing:
- Find the product on Amazon and copy its ASIN from the “Product details” section. You can also try searching for the product name, UPC, EAN, or ISBN of a product.
- In Seller Central, go to Catalog > Add Products.
- Paste the ASIN into the search bar to bring up the listing.
- Use the dropdown menu to select the condition of your product (e.g., New, Used – Like New).
- Click Sell this product.
- Set your price, choose your fulfillment method (FBA or FBM), and follow the prompts.
- (Optional) Enter a custom SKU to help manage your inventory.
- Click Save and finish.
- View and manage your offer under the Manage inventory section.
Make sure the product you’re listing matches the original exactly — same brand, model, size, and features. Listing against the wrong ASIN can lead to account issues.
Create a new product listing
If your item isn’t already being sold on Amazon, you’ll need to create a new listing. Only Professional sellers can do this, and while it takes more time than adding your product to an existing listing, it gives you full control over the product detail page, including the ability to optimize it for search and conversions.
Keep in mind: not all categories are open to all sellers. Some require category approval, while others are restricted entirely for third-party sellers.
To create a new product listing, you’ll need the following:
- Product identifier: A GTIN, UPC, ISBN, or EAN that uniquely identifies your item.
- SKU number: A custom code you assign to track your inventory.
- Offer details: Price, condition, quantity, and fulfillment method.
- Product details: Title, brand, category, description, and images.
- Search terms: Relevant keywords to help customers find your listing.
All of these will be used to build your product detail page, the page shoppers see when browsing Amazon.
Remember that Amazon is a search engine. Optimizing your product listings helps you rank higher and increase conversions. Here’s what to include for a high-quality product page, along with some best practices:
- Title: Use clear, keyword-rich titles that include the product’s brand, type, size, color, or key features.
- Keep it under 200 characters.
- Include the most relevant keywords upfront.
- Avoid using all caps or promotional language like “Best” or “#1.”
- Example: “Organic Cotton Queen Bed Sheets – White, 4-Piece Set, Hypoallergenic, 400 Thread Count”
- Images: Images play a huge role in whether a customer clicks “Add to Cart.” Amazon requires at least one image, but you should upload six or more if possible. You can upload up to nine images.
- Image tips: The main image must have a pure white background. Use high-resolution images (1,000 pixels or larger) to enable zoom. Show the product from multiple angles, in use, and with packaging.
- Video tips (optional but recommended): Showcase how your product works or solves a problem.
Keep it under 60 seconds with clear visuals and text overlays.
- Variations: If applicable, add options like color, size, or scent. Add a size reference or comparison in one of your photos. It cuts down on returns and improves buyer confidence.
- Bullet points: Use the five bullet points to clearly highlight the product’s key features, benefits, and use cases. Avoid vague claims, focus on what matters most to your target customer.
- Product description: Write a keyword-optimized summary that explains the product in detail. This section supports formatting features such as line breaks and limited HTML, which can make the content easier to read. Use the bullet points to answer common buyer questions or objections. For example, if you’re selling clothing, note fit, fabric type, and care instructions.
- Featured offer (Buy Box): Your listing may appear here if it meets Amazon’s criteria for price, shipping, and account health.
- Other offers: If additional sellers list the same product, their offers appear on the same detail page with different pricing or shipping terms.
If you are a Professional seller, there is also an option for you to bulk upload your products through the product feed tool.

Sync your product listings through an e-commerce platform
If you already sell on Shopify, you can connect your store directly to Amazon and avoid creating listings manually. Shopify’s Amazon channel app lets you sync your catalog in just a few steps.
Here’s how to do it:
- Go to your Shopify admin and install the Amazon channel app.
- Connect your Amazon Seller Central account.
- Choose the products you want to list on Amazon.
- Map your product details to Amazon’s required fields, including title, description, and images.
- Set your pricing and inventory rules for Amazon listings.
- Publish your products to Amazon from your Shopify dashboard.
Once synced, any changes you make to products in Shopify, like price updates or inventory counts, will automatically update on Amazon.
Shopify’s Amazon channel app makes it easy to sync listings, inventory, and fulfillment from a single dashboard. It’s the ideal platform for sellers building a multichannel strategy that includes both Amazon and direct-to-consumer sales. You can save time and reduce errors by syncing your Shopify catalog directly to Amazon.
Set a pricing strategy
Pricing directly impacts how often your product is seen —and whether it wins the Buy Box. The Buy Box is the featured offer on a product detail page — the box where customers click “Add to Cart” or “Buy Now.” Multiple sellers can offer the same product, but only one offer appears in the Buy Box at a time.
Winning the Buy Box means your offer is the default choice for shoppers. To improve your chances, focus on competitive pricing, reliable fulfillment, and strong account health. Amazon uses these factors to decide which seller’s offer is featured.
Amazon offers several pricing tools to help you stay competitive. I recommend using the Pricing Health dashboard available to you as an Amazon seller so you can make informed pricing decisions. To access it, go to the main menu in your dashboard, hover over Pricing, and select Pricing Health.
Here’s what you’ll find:
- Inactive Offers: Lists any listings Amazon has deactivated due to potential pricing issues. Suggested actions are provided so you can fix and reactivate them.
- Pricing Opportunities: Shows which of your offers aren’t eligible for the Buy Box and highlights listings priced within 5% of the current Featured Offer. Adjusting your prices here can improve your chances of becoming the Featured Offer.
Here are some pricing strategies I recommend:
- Match the market: Competitive pricing can improve your visibility and help you win the Buy Box.
- Consider value-based pricing: Set prices based on perceived value, not just cost or competitor pricing.
- Monitor total cost to customer: Amazon factors in shipping costs when evaluating offers — low item prices paired with high shipping fees may still lose out to better overall value.
- Automate pricing: Use Amazon’s Automate Pricing tool to adjust your prices based on rules you set, helping you stay competitive without constant monitoring.
That being said, there’s no one-size-fits-all approach. Test your pricing strategy and adjust as needed to stay competitive while protecting your margins.
Step 4: Decide on your fulfillment method
After listing your products, the next step is to choose your fulfillment strategy. Amazon offers several ways to fulfill orders:
- Fulfillment by Amazon (FBA): Amazon stores, ships, and handles customer service for your products.
- Fulfilled by Merchant (FBM): You store, pack, and ship orders yourself using Seller Central tools.
- Third-party fulfillment providers (3PLs): A non-Amazon partner fulfills your orders. You outsource to a non-Amazon partner who ships on your behalf — this is still considered FBM, but without Amazon’s FBA perks.
- Amazon Multi-Channel Fulfillment (MCF): Amazon handles fulfillment for orders placed on your own website or other marketplaces, even outside of Amazon.
Each method has trade-offs in terms of cost, control, and scalability. I’ll break them down so you can choose what works best for your store.
Fulfillment by Amazon (FBA)
With FBA, you ship your inventory to Amazon’s warehouse, and they handle everything else — storage, packing, shipping, customer service, and returns. FBA listings are also Prime-eligible, which boosts visibility and can improve conversion rates.
Here’s how it works:
- Prepare and label your products according to Amazon’s requirements.
- Ship your inventory to an Amazon fulfillment center.
- Amazon stores your products and ships orders as they come in.
| Pros | Cons |
|---|---|
|
|
Fulfillment by Merchant (FBM)
With FBM, you keep inventory in your own space (warehouse, home, or third-party facility) and ship directly to customers. You’re responsible for delivery, customer service, and returns. Amazon provides tools like Buy Shipping and printable labels inside Seller Central.
| Pros | Cons |
|---|---|
|
|
Via third-party fulfillment provider
Third-party fulfillment lets you outsource storage, packing, and shipping to a non-Amazon provider. It’s technically a form of FBM, but instead of handling fulfillment yourself, you hire a logistics partner, often called a 3PL (third-party logistics provider).
This option works well for multichannel sellers who want to streamline fulfillment across Amazon, their own website, and other marketplaces. Some partners, like ShipBob, cater to both small and high-volume sellers and offer fast, two-day shipping without requiring a minimum order volume.
Third-party fulfillment is ideal if you need flexibility outside of Amazon’s system, just be sure your partner can meet Amazon’s fulfillment standards, including delivery speed and reliability.
| Pros | Cons |
|---|---|
|
|
Amazon Multi-Channel Fulfillment (MCF)
If you’re looking for a done-for-you fulfillment option that works beyond Amazon, consider Amazon’s own Multi-Channel Fulfillment (MCF). It’s a program under FBA that lets you use Amazon’s fulfillment network to ship orders from your other sales channels, including Shopify, Etsy, and your own website.
Amazon’s MCF offers:
- Fast shipping options: One-day, two-day, and standard shipping to over 95% of the US population.
- High accuracy: A 99.98% order accuracy rate, which minimizes customer complaints and returns.
- Fast delivery: Over 97% of MCF orders ship on time.
MCF is especially useful if you want to centralize your inventory management while maintaining a presence across multiple sales platforms. Plus, you don’t need to be an Amazon Prime seller to use MCF — it works even if you’re primarily selling through other channels.
If you want to streamline your multichannel fulfillment even further, Shopify integrates directly with Amazon, letting you manage listings, inventory, and fulfillment across all your sales channels from one dashboard. With Shopify’s Amazon channel app, you can sync your product catalog, set up Amazon listings from within Shopify, and even automate order fulfillment using Amazon MCF. Start your free Shopify trial to simplify selling on both Amazon and your own website.
Factors to consider when choosing a fulfillment method
As you can see, each fulfillment method has its advantages. However, your fulfillment strategy should match your product type, sales volume, and business goals. Here are five things to consider before deciding:
- Type of products: If you’re selling small, lightweight items with high turnover, FBM can be a cost-effective way to start. But for larger or more fragile products, FBA may be the better fit. Amazon handles storage, packing, and fast delivery with consistent standards. Also consider category restrictions and special handling requirements; for example, perishables or hazardous items may come with limitations under FBA.
- Personalization and time savings: FBM gives you the flexibility to customize packaging or include personal touches like handwritten notes. This can be a differentiator for niche or brand-focused sellers. If you prefer to save time and outsource logistics, FBA removes the day-to-day burden of packing and shipping so you can focus on growth, sourcing, and marketing.
- Inventory management: With FBM, you manage storage, restocking, and packaging in-house — or through a third-party partner. This works well if you need constant access to your inventory or want control over storage conditions. On the other hand, FBA takes care of inventory storage entirely, which can save space and reduce operational overhead, but comes with fees and less visibility.
- Customer service and returns: FBA handles customer support, refunds, and returns for your orders. Amazon’s team is available 24/7 and follows consistent policies, which can improve customer experience. If you choose FBM, you’re responsible for handling all buyer questions and returns. This gives you more control but also adds to your workload.
- Sales volume: FBA is designed to scale. If you’re selling consistently or expect to move a large number of units, it can streamline operations and improve delivery speed. If your sales are seasonal or unpredictable, FBM may give you more control without committing to storage fees or inbound shipping requirements. Sellers with moderate volume can also explore third-party fulfillment to balance flexibility and efficiency.
Which fulfillment method should you choose?
There’s no one-size-fits-all answer. Many sellers start with FBA to leverage Prime and Amazon’s customer support. Others stick with FBM to avoid storage fees or maintain control over their fulfillment process. You can even use both for different product types.
I recommend monitoring your profit margins closely. Fulfillment costs vary depending on size, weight, and category — so what works for one product may not work for another.
Step 5: Manage and monitor store performance
Once your store is live, your work isn’t over. To stay competitive and in good standing with Amazon, you need to monitor your account activity, respond to buyers promptly, and keep a close eye on performance metrics.
Falling below Amazon’s standards can trigger warnings, suppress your listings, or even result in account suspension. Maintaining good performance improves your chances of:
- Winning the Buy Box.
- Earning higher search rankings.
- Gaining trust with buyers.
- Staying eligible for Prime and advanced tools.
So, stay proactive. Monitoring your account health regularly is one of the simplest ways to protect your store and build long-term success.
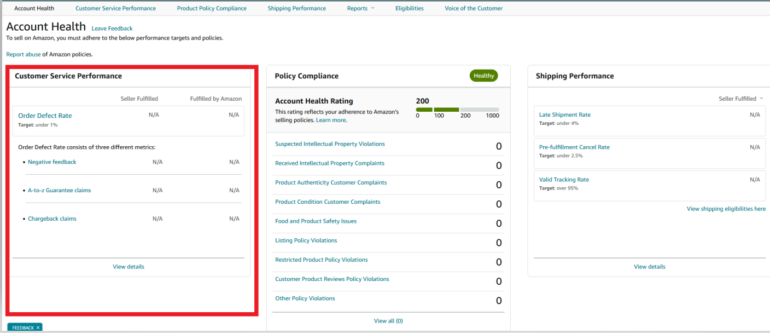
Monitor your account health.
Your Account Health dashboard gives you a real-time look at how well you’re meeting Amazon’s performance standards and policy compliance.
Here are some performance metrics to watch:
- Order Defect Rate (ODR): Should be under 1%. This includes negative reviews, A-Z Guarantee claims, and chargebacks.
- Late Shipment Rate (LSR): Keep this below 4%. This measures how often you confirm shipments after the expected date.
- Pre-Fulfillment Cancel Rate (CR): Must be under 2.5%. This includes orders you cancel before shipping.
- Valid Tracking Rate (VTR): Reflects the percentage of packages shipped with valid tracking info.
- On-Time Delivery Rate (OTDR): Measures the percentage of orders delivered by the promised date.
Use this dashboard to catch potential issues before they affect your seller status.
Handle customer communication and reviews promptly.
Amazon expects timely, professional communication. Buyers can message you directly, and you must respond within 24 hours, even on weekends and holidays. Turn on message notifications so you don’t miss a deadline. Late or missed responses can hurt your seller rating.
- Use the Messaging system in Seller Central to manage inquiries.
- Keep replies short and polite. Avoid upselling or promotional language.
- You can’t ask for positive reviews, but you can use the Request a Review button to encourage feedback.
Respond to A-Z Guarantee claims and chargebacks.
When a buyer files an A-Z claim or credit card chargeback, act quickly:
- If the claim is valid, issue a refund immediately.
- If you believe it’s a misunderstanding, respond with tracking information and a clear explanation through the claim system.
Tip: Keep a complete record of buyer communication and shipping details. You’ll need these if you need to dispute a claim.
Step 6: Promote and advertise your Amazon store
Once your listings are live and your operations are in place, it’s time to start driving traffic. Amazon offers a range of tools, from no-cost promotions to advanced ad placements, to help sellers reach more customers, increase conversions, and build brand recognition.
Use promotions and coupons to increase conversions.
Promotions give shoppers a reason to buy now. You can create several types of offers directly in Seller Central, including:
- Money-off discounts (e.g., “$5 off” or “10% off”).
- Buy one, get one free deals.
- Free shipping offers.
- Digital coupons that appear in search results and product listings.
Run ads with Amazon Advertising.
Amazon Ads let you pay to boost visibility for your products and brand. According to Amazon, small businesses using these tools attributed 30% of their sales to advertising.
You can access the following ad types through Seller Central:
- Sponsored Products: Promote individual listings on search results pages and product detail pages. These ads help increase visibility and are performance-based.
- Sponsored Brands: Highlight your brand with a logo, custom headline, and up to three products in a single ad. These appear in search results and help build brand recognition.
- Sponsored Display: Reach shoppers beyond Amazon through machine-learning-powered ads that appear across Amazon, third-party websites, and mobile apps—even if you’re not selling on Amazon exclusively.
Tip: Start with Sponsored Products to boost your top listings, then expand to Sponsored Brands as your catalog and brand presence grow.
Create an Amazon Store to showcase your brand.
With Amazon Stores, you can build a custom, multi-page storefront within Amazon. This branded space helps you tell your brand story, group related products by collection or use case, and provide a more immersive experience for shoppers. Amazon has a comprehensive creative guideline for Amazon Stores. This is especially useful if you’re selling multiple items under a single brand and want to establish long-term recognition and customer trust.
Support your promotions with strong post-sale experiences.
Your marketing doesn’t end at the sale. Earning positive product reviews and seller feedback helps reinforce trust and drive repeat purchases. To improve your chances:
- Accurately describe your products in listings.
- Pack items securely to avoid damage during shipping.
- Respond to customer messages within 24 hours.
- Always provide valid tracking numbers for each order.
When done consistently, these practices support both sales growth and long-term brand credibility.
Step 7: Get customer reviews
Great reviews start with delivering what you promise — accurate listings, on-time delivery, and responsive service. To actively encourage reviews and improve your store’s credibility, Amazon offers several built-in tools:
Request a review through Seller Central.
Amazon already sends review requests automatically, but if you want to follow up on a specific order, you can use the Request a Review button on the Order Details page. This sends a standardized message asking for both a product review and seller feedback.
- You can only send one request per order.
- The feature is available between 5 and 30 days after delivery.
- Messages are automatically translated into the customer’s preferred language.
Note: Avoid sending additional review requests through email or Buyer-Seller Messaging. These are considered unsolicited and may be blocked based on the buyer’s communication preferences.
Enroll products in Amazon Vine.
The Amazon Vine program helps generate high-quality, trustworthy reviews by inviting a select group of reviewers, Vine Voices, to test your product and share honest feedback.
- You can receive up to 30 reviews per enrolled product.
- Vine reviews can increase product visibility and boost sales.
- To use Vine, you must have a Professional seller account and eligible FBA listings.
- Your brand must be enrolled in the Amazon Brand Registry or have generic products.
Use the Customer Reviews tool
The Customer Reviews tool in Seller Central lets you track reviews across your product catalog and respond when needed.
- Flag and address low-star reviews (below 4 stars).
- Identify product or listing issues based on buyer feedback.
- Offer solutions to unhappy customers to improve satisfaction and prevent future issues.
Consistently using these tools helps you build trust with buyers and strengthen your long-term performance on Amazon.
Common mistakes to avoid when selling items on Amazon.
Even experienced Amazon sellers run into setbacks. To protect your store and increase your chances of success, avoid these common mistakes:
Poor product research: Jumping into a product category without understanding demand, competition, or profitability is one of the most common missteps. Some sellers rely solely on gut feeling or anecdotal trends. Instead, use keyword tools, study competitor listings, and calculate margins after fees. A product might sell well but still lose money once fulfillment and advertising costs are factored in.
Neglecting customer service: Amazon expects prompt, professional communication. Ignoring buyer messages, missing the 24-hour response window, or handling disputes poorly can lead to negative feedback, lower ratings, or even account suspension. Sellers should treat every buyer interaction as a chance to build trust and protect their seller metrics.
Underestimating Amazon fees: FBA storage costs, referral fees, and advertising expenses can erode your margins fast if you haven’t accounted for them. Many new sellers price too low and end up operating at a loss. Before listing any product, run it through Amazon’s FBA calculator and understand your break-even point.
Violating Amazon’s policies: Amazon has strict rules around listings, communication, and reviews. Common violations include using copyrighted images or brand names without permission, creating misleading or inaccurate product descriptions, and offering incentives in exchange for positive reviews.
Even unintentional mistakes can result in listing suppression or account deactivation. Review Amazon’s selling policies regularly and audit your listings to stay compliant.
Tip: Set up regular reminders to check your Account Health dashboard. Staying proactive is the best way to catch issues before they escalate.
Understanding costs and seller fees
Part of selling products on Amazon is understanding the associated costs of selling on the platform. To build a profitable Amazon business, you need to understand how Amazon’s fees work and how they affect your margins. Amazon deducts all applicable fees from your sales earnings before making payouts every 14 days.
There are three primary types of seller fees:
- Sale-related fees: These include referral fees (charged on every sale) and closing fees (in specific categories).
- Account fees: These are charges based on the selling plan you choose: either per item or a flat monthly fee.
- Shipping and fulfillment fees: Depending on how you fulfill orders (FBA or FBM), you’ll pay storage, packing, and shipping costs.
Amazon may also apply miscellaneous fees, such as for high-volume listings or refund processing, depending on how you operate.
Breakdown of Amazon seller fees
| Sale-related fees | ||
| Referral fee | Percentage of total item price, including shipping and gift wrap. | Typically 6%-15% (up to 45% in rare categories) |
| Closing fee | Applies to media products (books, DVDs, etc.). | $1.80 per item |
| Account fees | ||
| Selling plan fee | Charged monthly or per item sold, depending on your plan. | Individual: $0.99/item Professional: $39.99/month |
| Shipping & fulfillment fees | ||
| Fulfillment fee (FBA) | Per-unit charge for picking, packing, and shipping. | Based on size and weight |
| Storage fee (FBA) | Monthly fee for inventory stored in Amazon’s warehouses. | $0.75-$2.40/cu ft (varies by season and inventory age) |
| Returns processing fee (FBA) | Applies to certain product categories when Amazon handles free returns. | Varies by category and item |
| Miscellaneous fees | ||
| Refund administration fee | Charged when issuing a refund. | $5.00 or 20% of refunded amount (whichever is lower) |
| High-volume listing fee | For inactive ASINs above 100,000 listings. | $0.005 per listing/month |
| Optional program fees | Includes optional services, rentals, or premium tools. | Varies |
Estimating profitability
Before you list any product, run it through Amazon’s FBA Revenue Calculator. This tool lets you input the item’s sale price, cost of goods, shipping, and fulfillment method to estimate your net profit per unit.
Always calculate profitability at the per-unit level. Overlooking even small fees can shrink your margins, especially if you’re selling low-cost or heavy items.
Scaling and growing your Amazon store
Once your Amazon business is up and running, the next step is growth. Whether you’re looking to expand your catalog, reach new markets, or streamline your operations, Amazon provides tools and programs to help you scale without losing control.
Grow with the New Seller Guide.
Amazon’s New Seller Guide helps you build momentum in your first 90 days. According to Amazon, sellers who follow the guide generate approximately 6x more first-year sales on average.
To get started, you need to be under a Professional selling account. Then, complete the following actions within your first 90 days:
Use AI to forecast demand.
AI-powered tools like Jungle Scout help you predict demand using keyword traffic, sales trends, and seasonality data. These insights make it easier to plan purchases, avoid slow-moving inventory, and identify which products are worth scaling.
Strengthen your brand with Brand Registry and A+ Content
Registering your brand unlocks tools to protect your listings and improve conversion rates.
- Brand Registry gives you greater control over your listings and helps prevent counterfeits. Amazon now blocks more than 99% of suspected infringing listings before brands need to take action.
- A+ Content allows you to add enhanced visuals, charts, and branded messaging to your product detail pages — helping build buyer trust and increase sales.
Expand with Amazon Business.
Amazon Business opens the door to bulk buyers like companies, schools, and government agencies. These customers typically purchase in larger quantities, return items less frequently, and look for volume discounts or business-only pricing.
You can enable business pricing, quantity discounts, and access analytics tailored to B2B behavior directly in Seller Central.
Discover new product ideas with Product Opportunity Explorer.
The Product Opportunity Explorer gives you insights into what Amazon customers are searching for, and more importantly, what they aren’t finding. You can spot unmet demand based on real-time Amazon search and purchase data, and analyze pricing, reviews, and competition across categories. Use these insights to launch profitable new products that meet actual customer needs.
Sell internationally with Amazon Global Selling.
With Amazon Global Selling, you can expand into international marketplaces like Canada, the UK, and Germany using Amazon’s infrastructure. Amazon helps simplify language localization, currency conversion, and shipping logistics, and you control where and how your listings appear internationally. Start by testing your best-performing products in new markets to gauge demand before scaling up.
Frequently asked questions (FAQs)
What are the best ways to sell on Amazon?
There are three main ways to sell on Amazon: by matching existing listings, creating new product listings as a Professional seller, or syncing your catalog from an e-commerce platform like Shopify. Each method has its pros and cons, but syncing through Shopify is often the most efficient if you already have a store.
How do I get started selling on Amazon with no experience?
Start by signing up for a Seller Central account, choosing the Individual plan if you’re testing the platform. From there, list your first product by matching an existing listing or creating a new one. Amazon also provides webinars and a New Seller Guide to help you navigate your first 90 days.
Is selling goods on Amazon still profitable in 2025?
Yes, but only if you understand the fees, competition, and marketing strategies. Using tools like Amazon’s Pricing Health dashboard and automating pricing can help you stay competitive. Many sellers also find success by combining FBA with promotions or multichannel tools like Shopify.
Can I sell items on Amazon without being a business?
Yes. You don’t need to register a business to sell on Amazon. During account setup, you can select “None, I am an individual” under business type. That said, creating a registered business can offer tax advantages and simplify things if you plan to scale.
Is it free to sell on Amazon?
No, it isn’t. While creating an account is free, Amazon charges per-sale fees and may apply monthly subscription or fulfillment charges depending on your setup.
What is the difference between FBA and FBM?
With FBA (Fulfillment by Amazon), Amazon stores and ships your products. With FBM (Fulfilled by Merchant), you handle storage, shipping, and customer service yourself.
How do I get paid as an Amazon seller?
Amazon deposits your earnings directly into your bank account, usually every two weeks, after deducting applicable fees.